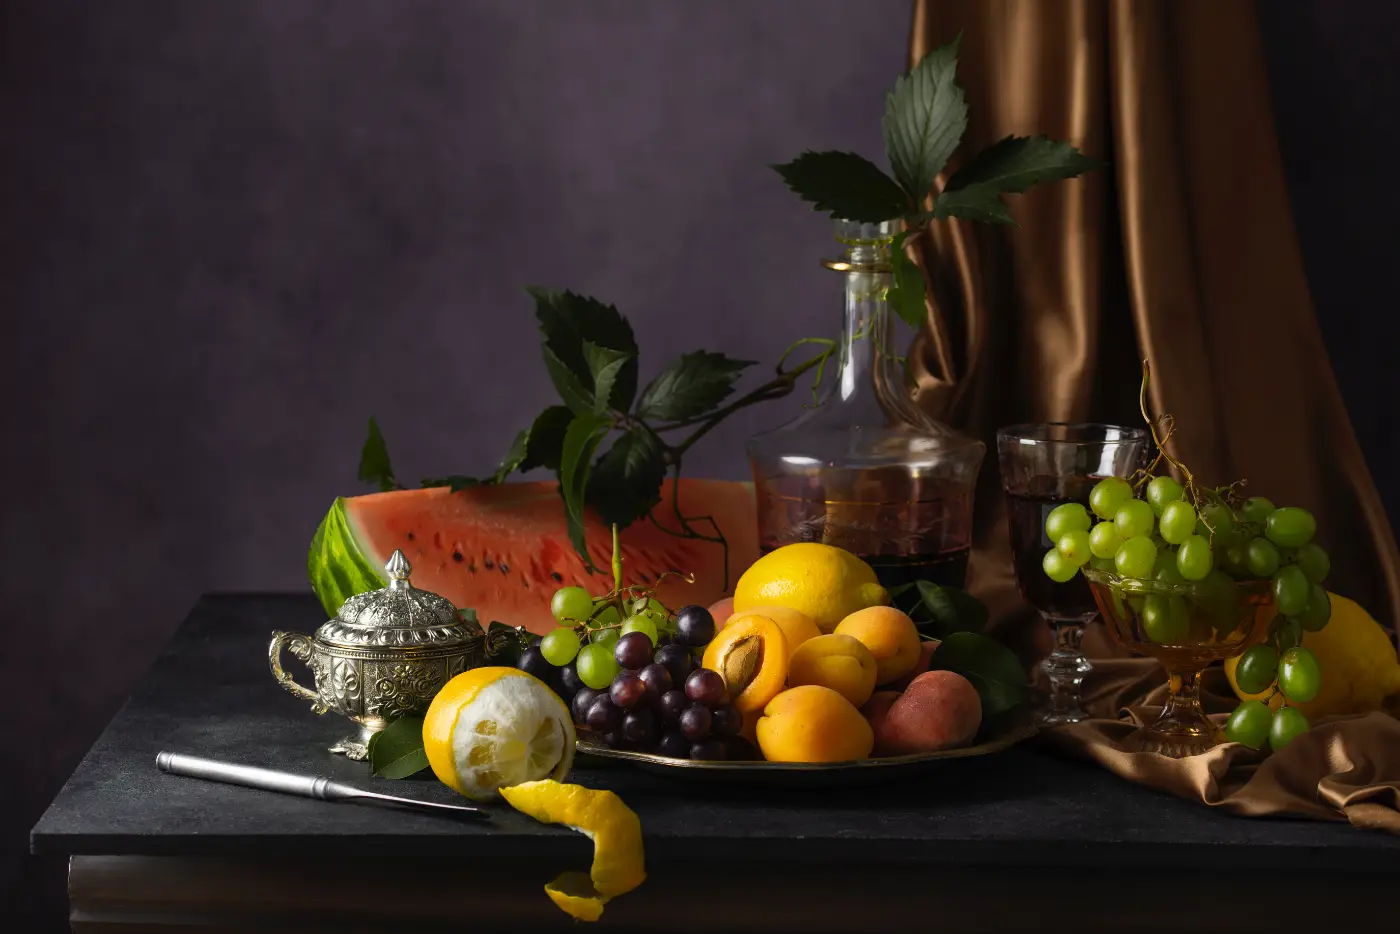
Since the Renaissance, artists have focused on creating still lifes, a genre that never seems to lose its appeal. In the 17th century, artists in the Netherlands and Flanders focused on immortalizing flower arrangements, tables draped with elegant tablecloths, jugs or musical instruments. Still life photography can capture images that are astonishingly similar to those classic paintings of the past.
Of course, you don't have to photograph still lifes that look exactly like Renaissance paintings, but with still life photography we can use the insights of the old masters.
You can create an efficient still life photo studio in your own living room and both manipulate artificial light such as flash to take professional photos. Read what is possible when creating a photographic still life in your living room.
Camera and settings
Still life photography does not necessarily require anything special in terms of camera equipment. However, in some cases you are better off with a tripod, especially if your light source is filtered or otherwise indirect. With a tripod you can select a small aperture, which may be necessary for good clarity across the entire image.

Keep in mind that small apertures require long shutter speeds in low light, and long shutter speeds require stability. With the tripod you will also need a cable or a remote control, as simply touching the shutter button can sometimes be enough to introduce camera shake into the shot.
If you don't have a remote control, try your camera's self-timer function. Set this to five seconds, which should be enough time for the vibrations to stop after you manually press the button.
Choosing a subject
Unless you're actually trying to duplicate those Renaissance still lifes, you don't have to limit yourself to photos of fruit, clay jars, and linens. Almost anything in your home can make an excellent still life, provided it falls into the category of visual perfection.
If you look at all those beautiful still lifes from the Renaissance, you will see almost no imperfections at all. So you have to avoid any imperfections in the still life subjects by zooming in or out or by hiding them. This means that you do not photograph bruised apples, dried out flowers or broken dishes.

Before you decide which collection of objects to photograph, the most important question is whether the objects fit together well. Then think about how the objects can be arranged.
Objects that are more or less the same height make for a somewhat static and boring photo. Objects of different heights, on the other hand, will encourage the viewer's eyes to move across the entire image, rather than just from left to right.
Then search for color combinations that fit well together. The Renaissance masters tended to choose colors with a more earthy palette, even their flowers did not seem to particularly sparkle. Of course, you don't have to stick to an earthy palette for your photos, but make sure you understand which colors work best together.
Complementary colors are almost always a good choice. Analogous colors—those next to one another on the color wheel—also work well. Most still lifes aim for a calm, serene mood, so avoid too many clashing or intensely bright colors. Keep it simple for the strongest effect.

Finally, when choosing an object for your still life, look for subjects with interesting texture. An object with a smooth surface can be an interesting subject, but since still life is really all about the light, you will end up with a much more interesting photo if you choose subjects with an interesting texture. The peel of an orange is a good example.
As a general rule, you highly reflective objects, such as wine glasses and silver, should be avoided when first starting out with still life photography. It can be quite a challenge to properly highlight shiny objects, and you'll need to spend a lot of time working around glare and reflections.
Furthermore: the rule of odds says that people feel more comfortable viewing odd-numbered groups of objects. Start with three objects and then try five, but don't overdo it, you don't want to overwhelm your viewer by giving them too many things to look at. Still life photos should be full of form and texture, but too much of anything can be bad. When in doubt, simplify.
The lighting
Now that you know what you're going to photograph, you need to think about the light. Light is always important, but in still life photography it is almost everything. Fortunately, you don't need an expensive photo studio to do this properly. If you have a kitchen window with natural light, all you have to do is place a table next to it and you have an instant home studio.

If you don't have a window with perfect light at home, you can also use table lamps or ceiling lamps equipped with daylight-balanced light. If you can't find these types of lights, use your camera's custom white balance setting. Even still lifes taken under incandescent lighting can still look quite natural.
Light is always important, but in still life photography it is almost everything.
Just as important as the quality of the light is the direction of the light. The great thing about window light is that it is soft and even, but that won't make a difference if you don't position your subject to make the most of that beautiful light.
Most still lifes look best when the light comes from the side. On the other hand, backlighting a subject can result in a photo that is too dark or has a distracting, washed-out background.
If you light your subject from the front, you will quickly end up with an image that is a bit dull. Light from the front can make a subject look flat and dimensionless because shadows are needed to enhance detail. When you light a subject from the front, the shadows fall behind the object, making them no longer visible to the camera.

You can use some extra light to fill in the shadows if you find that you're not getting the right amount of lighting from the window or from a single light source. Do this with a second lamp, or simply bounce the light into the shadows using a reflector placed on the opposite side of the light source. If you use a second light, remember that for the most drama, your main light should be closer to your subject than your secondary light source.
The basics of artificial light
Unlike natural light, artificial sources offer complete control over intensity, direction and quality. In still life photography, this control can be the difference between a flat image and one that appears three-dimensional and vibrant.
Mastering artificial light does not have to begin with expensive studio lamps. A versatile source already in many homes is the ceiling light. Although often overlooked, a ceiling lamp can serve as an overhead or fill light in a makeshift studio with the right adjustments.
For softer shadows and diffused light, use a lampshade or diffuser. The trick is to make sure the light covers your subject evenly. Remember, the wider the light, the softer the shadows. So a ceiling lamp with a wide perimeter is preferred for a soft light fall.

Flash
Flash in still life photography can be harsh, causing overexposed highlights and heavy shadows. This is where bounce flash becomes useful.
Bounce flash involves pointing your external flash (such as a speedlight) away from your subject and toward a neutral-colored surface, such as a white wall or ceiling. The light hits the surface and scatters, softening the shadows and replicating the effect of a larger, natural light source. This technique is particularly effective at eliminating the harshness that direct flash can cause.
Combining multiple light sources
Consider adding more dimension to your lighting setup. Combining a ceiling light, bounce flash, and additional light sources can create depth and emphasize selected areas.
The background
If you look at some of those famous Renaissance paintings, you will find that the backgrounds are almost exclusively dark and plain. The same should apply to still life photos. Choose a simple background. This does not necessarily have to be dark, but should be free of distracting elements, such as multiple and bright colors that overpower your subject.

A common mistake when choosing a still life background is using wrinkled fabric. These small flaws may not stand out in person, but in a photograph they draw the viewer’s eye away from the subject and toward the creases. Make sure the background is clean and wrinkle-free before hanging it behind the subject.
Light painting
The technique of light painting can be used to more closely imitate the classical Renaissance style. Set up in a dark room and use only one flashlight as a light source.
The advantage of lighting your subject with a flashlight is that as a smaller light source it gives better overall color saturation, and because it is also a mobile light source you don't get harsh shadows.
You can illuminate the shot from multiple directions and selectively add more light to some areas and less light to others. And when you use Bulb mode, you can leave the shutter open for as long as you need, so you get light wherever you want it.

When painting with light, remember that larger beams of light create a softer, flatter effect and that small beams of light enhance texture and color saturation. Use side lighting just as you would with a constant light source, as this enhances texture and adds dimension and drama.
Conclusion
Setting up a still life studio in your living room doesn't require extravagant equipment. Often the magic lies in the everyday elements around you. Understanding and manipulating artificial light sources can take your photography to the next level, giving you professional-quality images.
Trying to recreate great paintings from the past can teach you about light, texture, and the composition of objects. After that, it is time to create your own appealing still lifes.
By trying to recreate the great paintings of years gone by, you can gain insight into light, texture and good composition of objects. After this it is time to come up with some pleasant stills yourself.
Read this article in Dutch: Stilleven fotostudio thuis: tips voor beginners.



