2026 update: This article was originally published in 2006, when digital SLR cameras were rapidly gaining popularity and sensor dust was a new problem for many photographers. Modern cameras usually have automatic sensor cleaning and better dust prevention, so sensor dust is less often a major problem. It can still occur, however, especially in cameras with interchangeable lenses and when lenses are changed in dusty conditions.
The arrival of digital photography—and the end of scanning ‘dirty’ slides and negatives—also seemed to mean saying goodbye to dust in digital images. At most, an occasional blemish might appear in a photograph from a digital compact camera.
With the rise of digital SLR cameras, however, dust returned. Some photographers panic and become obsessed with spotless equipment, although common sense and care are more appropriate.
Why Dust?
A unique feature of an SLR or mirrorless camera is its interchangeable lenses, which provide a great deal of flexibility and versatility. While a lens is being changed, however, the camera body is open to the outside air and dust can enter.
Another, often larger, source of contamination is dust on the rear of the lens you are about to attach. The rising mirror can dislodge these particles. With a film camera, dust left the camera with the negative after each photograph and could not accumulate. A digital SLR has no ‘natural’ outlet, so much of the dust eventually lands on the sensor. At some point, these particles become visible in photographs.
When Is It Visible, and How Can You Check?
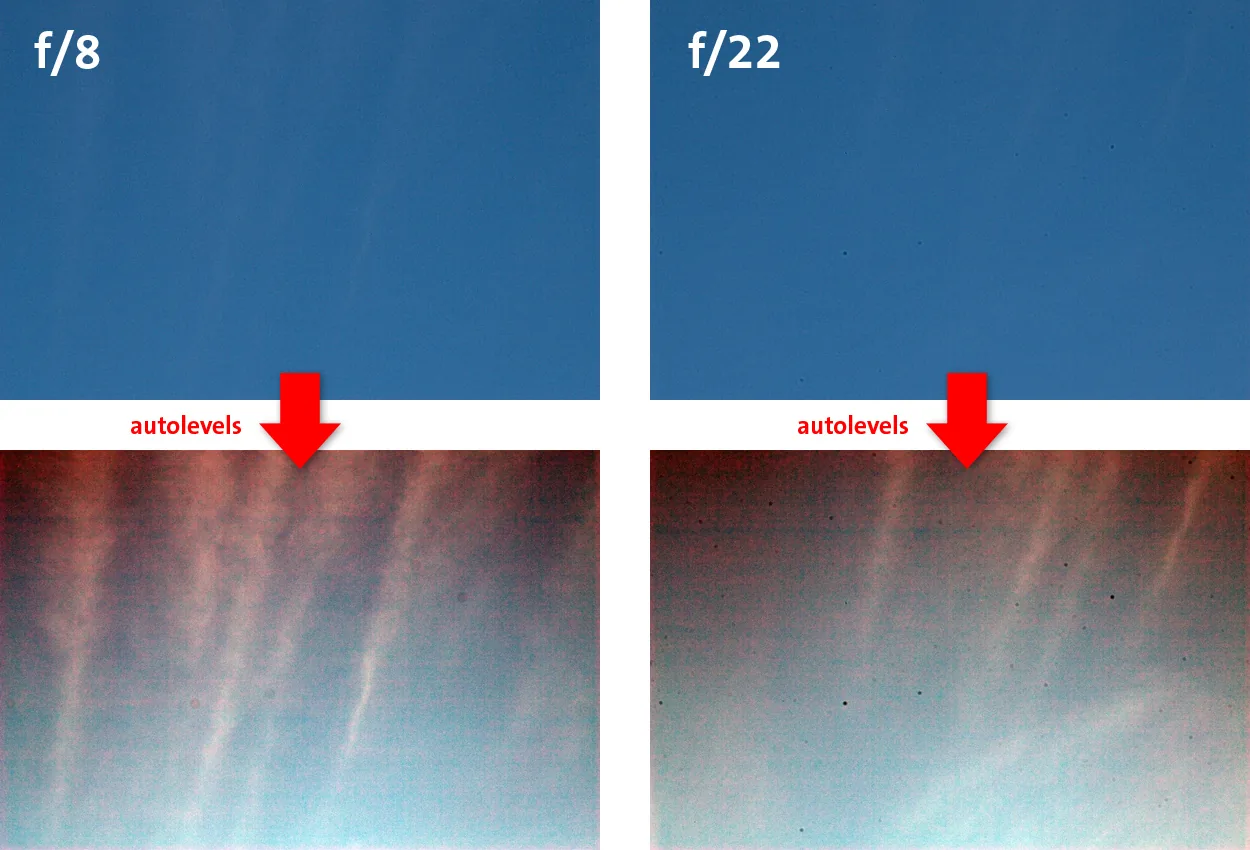
Dust on the sensor becomes visible only as depth of field at the image plane increases, which happens at small apertures. At f/4, dust will not be visible in the photograph, but stop down to f/11, as you might for macro photography, and black spots become apparent (figure 1). Fibers can sometimes appear as faint streaks. Dust particles and fibers on the sensor appear in exactly the same place in every photograph.

To check whether your camera sensor has dust on it, photograph a clear blue sky. Set the camera to aperture-priority mode (Av) and choose an aperture of f/22 or smaller. Focus manually at infinity and take a photograph. Make sure there are no birds or aircraft in the frame that you might later mistake for dust. You can also photograph another plain, light-colored subject, but take care to avoid motion blur and ensure correct focusing.
Because it can be difficult to determine exactly where the dust particles are in a photograph, apply Auto Levels in a photo-editing program so that faint blemishes become distinct dots (figure 2). You will almost always see some dots at f/22, but as long as they are not obvious at f/8 or wider, there is no need to clean the sensor immediately.
Prevention and Treatment
When changing a lens on an SLR, avoid visibly dusty surroundings and excessive wind or drafts. Keep the camera angled slightly downward while changing the lens. Have the new lens ready and make sure its rear element is free of dust. Change lenses quickly, but remain careful. Even if you regularly use different lenses, these precautions can keep dust from becoming a problem for a year. However careful you are, a dust particle can always enter the camera body.
Fortunately, more and more cameras include systems that remove this dust automatically. High-frequency vibrations shake the sensor, causing dust to fall off and adhere to a sticky strip. The system was developed by Olympus under the name Super Sonic Wave and was later adopted by Sony, Pentax, and Canon. However effective sensor cleaning may be, care remains essential.
How Should You Clean It?
Thanks to internal sensor cleaning, many newer cameras no longer require you to remove dust and other contaminants from the sensor yourself. If your camera does not have this cleaning function, however, you will need to take action yourself. The best approach is to take the camera to your retailer or directly to your camera brand’s repair center. This avoids tinkering with it yourself and ensures the job is done properly.
The main problem with cleaning it yourself is that physical cleaning tools may enter the delicate heart of the camera. If you make a mistake and damage the mirror, shutter, or sensor, you may have no recourse under the warranty. Professional cleaning, on the other hand, can cost money and may leave you without the camera for several weeks.
Cleaning It Yourself
If you nevertheless want to clean the sensor yourself, several methods are available. In every case, you must be able to see the sensor. The camera menu will include a sensor-cleaning option. This raises the mirror and opens the shutter so you can look directly at the sensor.

The Air Blower
The least risky method of removing dust from the sensor is to blow it away with an air blower without a brush. These cost a little over ten euros from specialist camera retailers and online. Work carefully inside the mirror box and avoid blowing dust from the edges farther into the camera.
Do not insert the nozzle too far into the camera, as this could damage sensitive components. This method is not completely effective, but it often removes the worst contamination.
The Mini Vacuum
Do not use compressed air. Its force can damage the sensor, and aerosol cans may contain moisture or oil that could be blown directly onto it.
Some products now work like miniature vacuum cleaners, drawing air in rather than blowing it out. They are less risky than compressed air, but the work still requires great care.
Cleaning Fluid
Besides air, cleaning fluid can be used to tackle dust. It is almost perfectly effective, but naturally involves risk because a swab carrying volatile fluid touches the sensor. This method is also known as a sensor swab.
Using too much fluid can leave streaks on the sensor, making the remedy worse than the problem.
The Sensor Brush
Another increasingly common method is the sensor brush. This is a soft brush that is given a static charge with compressed air and then passed gently over the sensor so dust particles adhere to it.
After cleaning the sensor, take another photograph of an evenly colored subject to assess the result. Remember that the image in the photograph is rotated 180 degrees relative to the sensor. If you still see a speck at the bottom right, you need to clean the top left more thoroughly.
Conclusion
Although dust on the sensor is unavoidable with a digital SLR camera, it is not immediately a practical problem. There is no need to become obsessed with spotless equipment.
If you do not see dust spots in photographs taken at f/8 or wider, there is no need to intervene. If dust eventually becomes visible at your working apertures, several cleaning methods are available, each with advantages and disadvantages, but none is guaranteed by the manufacturer.
Most modern interchangeable-lens cameras now have some form of automatic sensor cleaning. Sensor dust is therefore less likely to become a major problem than it was in the early days of digital SLR photography. It has not disappeared completely: photographers who change lenses frequently, work outdoors, or use small apertures can still encounter dust spots. Careful lens-changing practices remain advisable.



