Preview of Scott Kelby's The Lightroom 3 Book, Chapter 4, Developing Your Photos (11)
Adjusting Individual Colors with HSL
If you want to make a global adjustment to a particular color in a photo—for example, making all the reds redder or the blue sky bluer—you do so in the HSL panel (HSL stands for Hue, Saturation, and Luminance) and/or the Color panel. (Both are grouped with the Black-and-White panel.
For now, we will look only at strengthening or weakening individual colors. Black and white is covered later in the book.) Here is how it works.
Step One:

If you want to adjust just one color range, scroll to the HSL panel among the panels on the right. (The words HSL, Color, and Black-and-White in the panel header are not merely labels. They are buttons that reveal the controls for the corresponding panel.)
For this example, click HSL. Four buttons appear: Hue, Saturation, Luminance, and All. In the Hue section, you can change an existing color into another by dragging the sliders.
To get a sense of what this does, drag the Orange slider all the way to the left. The Ferrari's yellow tachometer turns orange. (This is not my Ferrari, by the way. I have a newer model. Just kidding. Unfortunately, I do not own a Ferrari.) Click the Reset button at the very bottom of the panels to undo the adjustment.
Step Two:
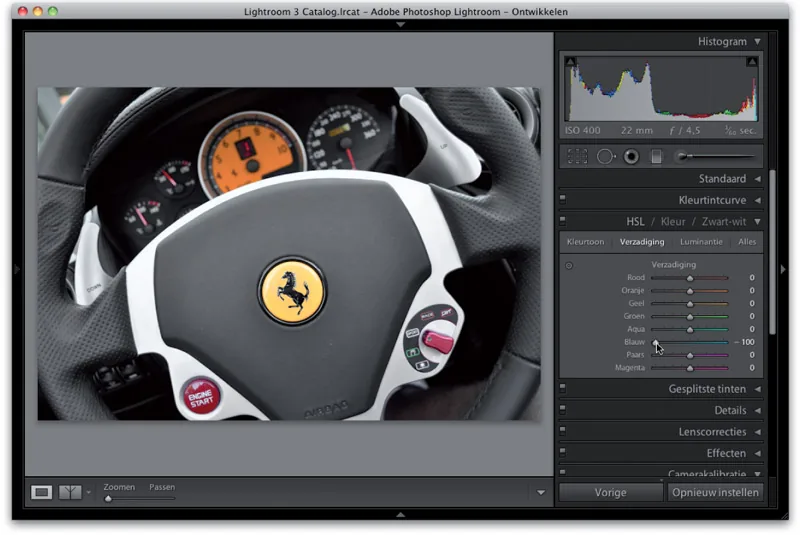
Because the Ferrari was in the shade, there is a blue cast over the steering wheel. Adjusting the white balance would change every color in the photo, whereas I only want to address that blue on the wheel. It is a perfect job for the HSL panel.
Click the Saturation button at the top of this panel. The same eight sliders remain visible, but now they control the saturation of the colors in the photo. Drag the Blue slider to the left until the blue disappears from the steering wheel. (The illustration shows that I dragged it all the way to the left.)
I rarely use the HSL panel without the TAT!
Step Three:
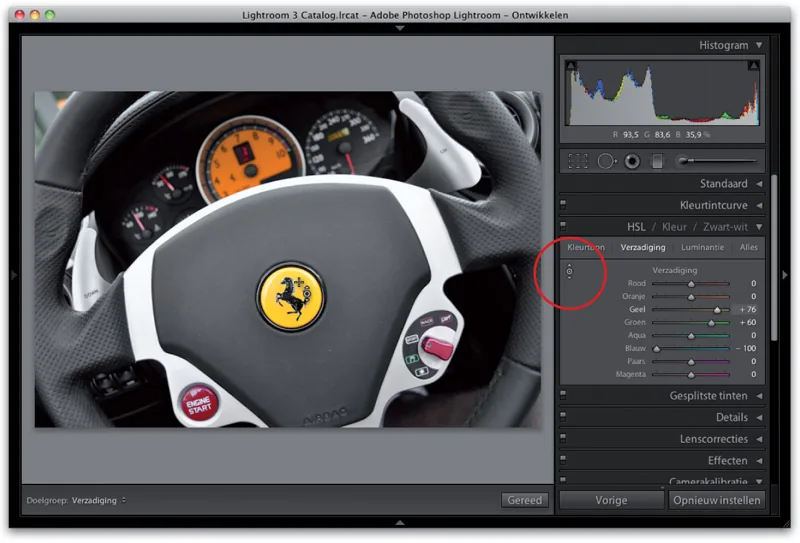
If you know exactly which color you want to adjust, you can immediately drag the appropriate slider. If you are not sure which colors are present in the area you want to adjust, use the TAT. (The TAT is the same Targeted Adjustment tool found in the Tone Curve panel, but here it adjusts color rather than contrast.)
Click the TAT (circled in red in the illustration) and move the pointer over the yellow logo in the center of the steering wheel. Click and drag upward for more saturated colors. Notice that not only the Yellow slider but also the Green slider moves. You probably did not realize there was green in the logo, which is exactly why this tool is so useful here. (I rarely use the HSL panel without the TAT!)
Step Four:
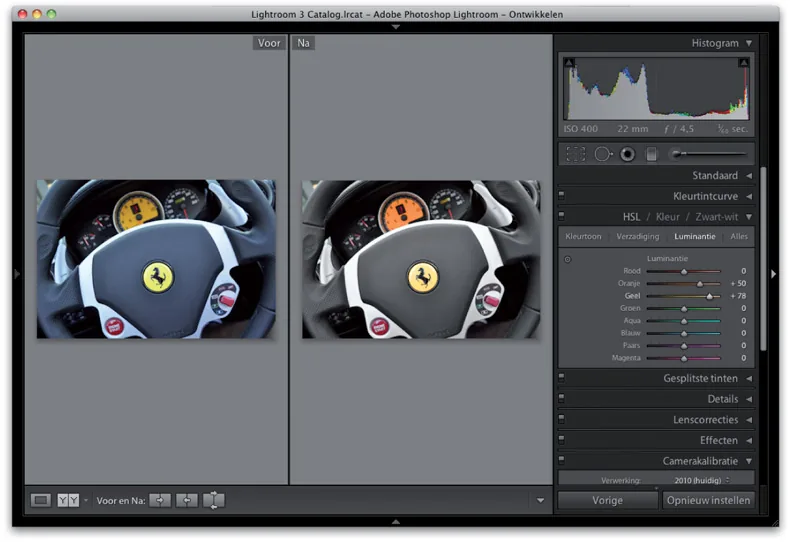
Click Luminance at the top of the panel. (This slider controls how light or dark the colors are.) To brighten the tachometer, select the TAT, click the tachometer, and drag straight upward.
The gauge becomes lighter. (Under Luminance, the Orange and Yellow values increase.) Photoshop users will quickly notice that this is very similar to Photoshop's Hue/Saturation control. There are a few differences, however.
Lightroom has two additional sliders (Orange and Purple), Lightroom calls ‘L’ Luminance while Photoshop calls it Lightness, and Lightroom uses an Aqua slider instead of Cyan. And, of course, Lightroom has the TAT. (Which is a good thing.)
Two final notes: the All button at the top of the panel displays all three sections one below another, while the Color panel presents each of them in sets of three colors (somewhat like Photoshop's Hue/Saturation control). They all work the same way, regardless of how they look.



