In Scott Kelby's seven-point system for Lightroom Scott has distilled the editing process down to the seven most important edits you need to professionally enhance your photos. Moreover, he has determined the correct order of these, and when and how these seven techniques should be applied. Read a preview of Lesson 5 here now, Panorama.
In this lesson, Scott will work on the photo below, a panorama consisting of eight different photos. While visiting Yosemite National Park in California, where he was a guest instructor for Lightroom, Scott set out early in the morning to photograph Mount El Capitan.

He originally wanted to use a wide-angle lens, but to keep the mountain large and impressive, he opted to take eight overlapping photos. These photos were later combined in Lightroom into one panoramic photo.
Step 1
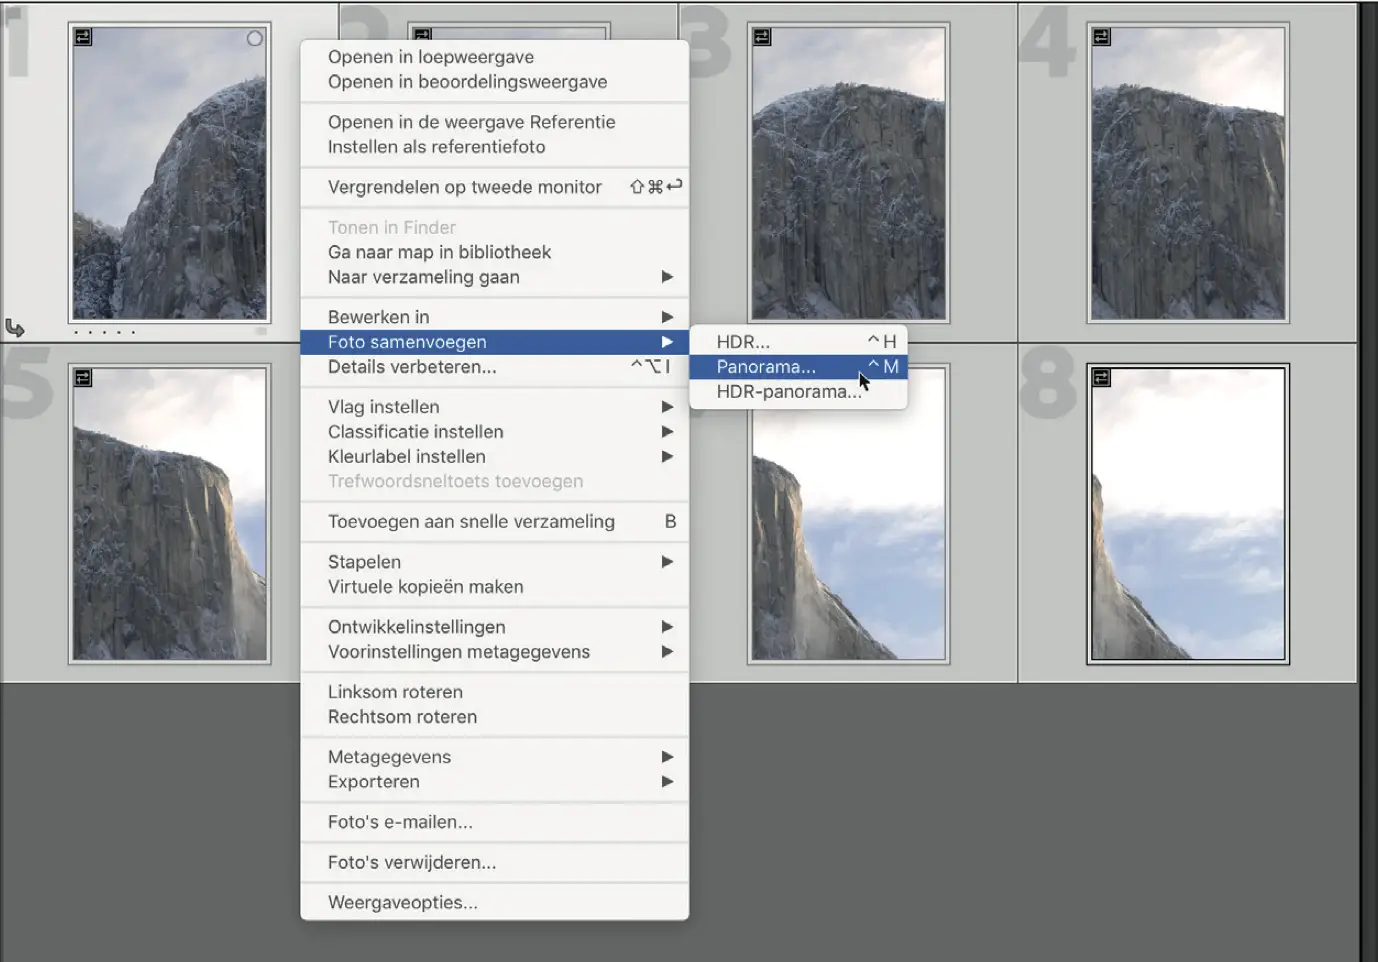
In Lightroom Classic's Library module, the eight original photos have been imported in a vertical format, ideal for panoramas to minimize edge distortion.
- To in Lightroom a panoramic view To compose successfully, the photos should overlap by about 30%.
- When shooting, the camera can be hand-held without adjusting the settings, although it is sometimes better to focus manually.
- It is recommended to turn off the autofocus after the first photo has been focused.
- Using a tripod can be useful, but the choice of convenience or complexity depends on the user.
To select the photos, click on the first photo and then, while holding down the Shift key, click on the last photo.
Step 2
After you have selected the photos, right-click on any copy and in the shortcut menu that appears, first choose the option Merge Photo and then Panorama (Merge Panorama in Lightroom in the cloud), see image.
Step 3
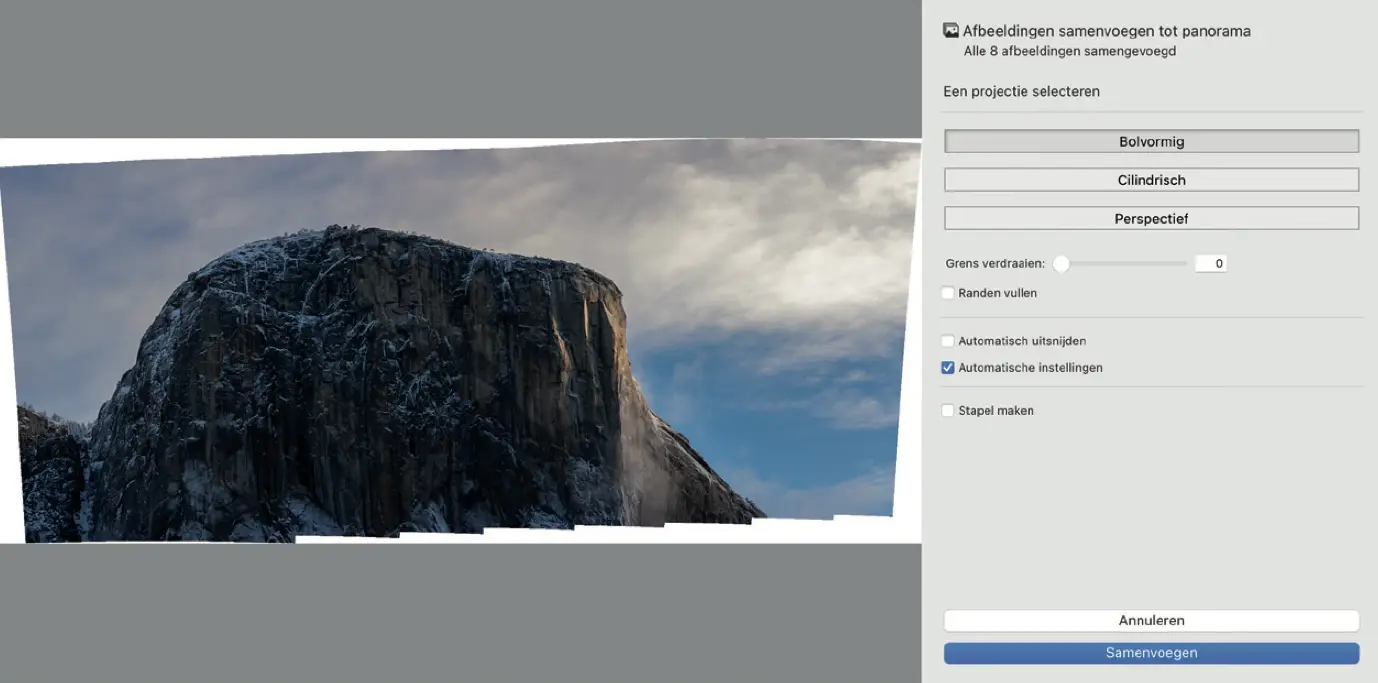
When the "Merge Panorama Preview" dialog box opens in Lightroom, it defaults to the spherical projection option, which usually produces the best results. Only occasionally (1 in 50 times) is another projection such as Cylindrical or Perspective necessary.
White edges may appear in the panoramic photo, and while the "Auto Crop" option can remove this, it makes the photo smaller, which is not desirable if one wants to keep the entire panoramic image.
Step 4
Instead of cutting white edges from the panorama photo, the "Fill Edges" option is used. This uses Photoshop's "Content Aware Fill" technique to intelligently fill white areas. Although the results are mostly positive, they are not always perfect. If "Fill Edges" does not work well, the "Warp Border" slider can be used as an alternative.
Default settings like "Automatic Settings" and "Create Stack" are usually checked, the latter to neatly stack the source photos under one thumbnail. Finally, the operation is completed by clicking "Merge".
Step 5
You will now see the thumbnail stack with the eight photos for the panorama plus the panorama itself, all under one thumbnail. The number 9 in the top left corner lets you know that you are dealing with a stack and how many photos that stack contains. If you click on the 9, the stack will be expanded and you will see all the photos.
Well, the panorama has been created, now the seven-point system can be applied to it.
Step 6
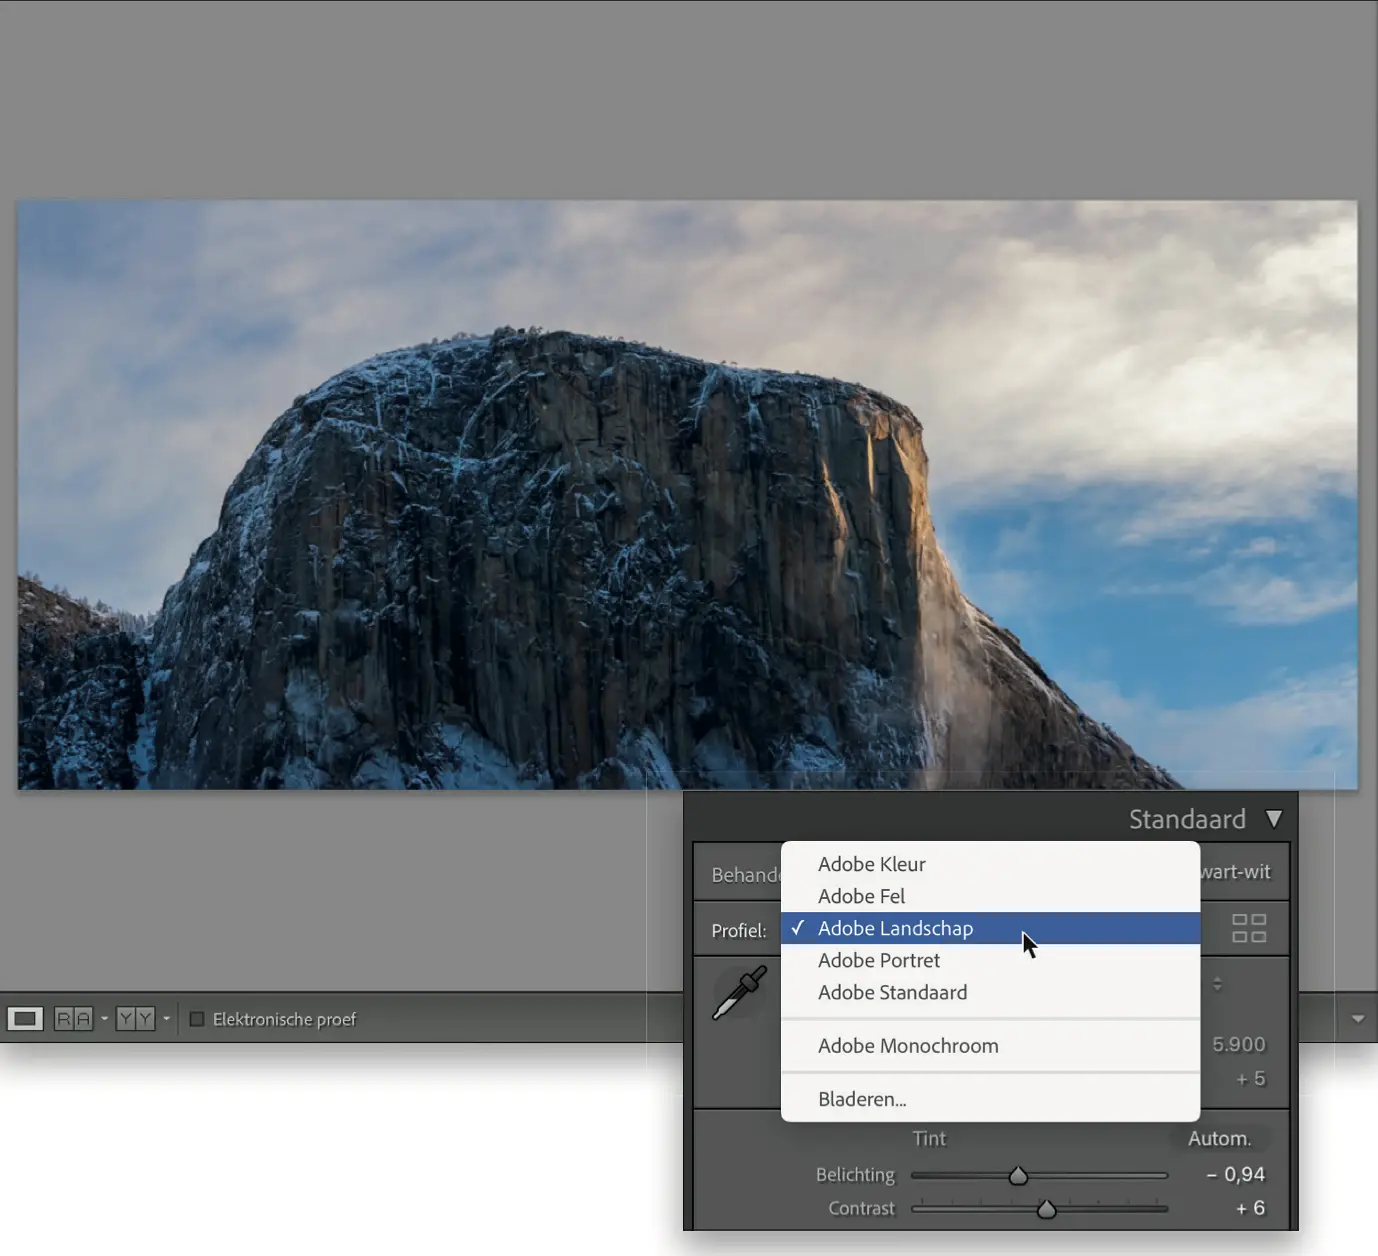
Start as usual with point 1 of the system: In the Develop module, go to the Standard panel (the Edit panel in Lightroom in the cloud) and choose Adobe Landscape from the Profile drop-down list. That choice is quickly made, especially with a landscape photo. The result in this case is quite decent: the photo gains more contrast and becomes more colorful.
Step 7
When reviewing the photo, the blue color on the mountain is noticeable, caused by the camera's automatic white balance. To solve this point 2 of the seven-point system. Using the 'Select White Balance' tool in Lightroom and clicking on a neutral colored point (here, a snowy rock in the shadows) will improve the color balance. After this correction, the mountain looks more realistic at sunrise without the blue tint.
Step 8
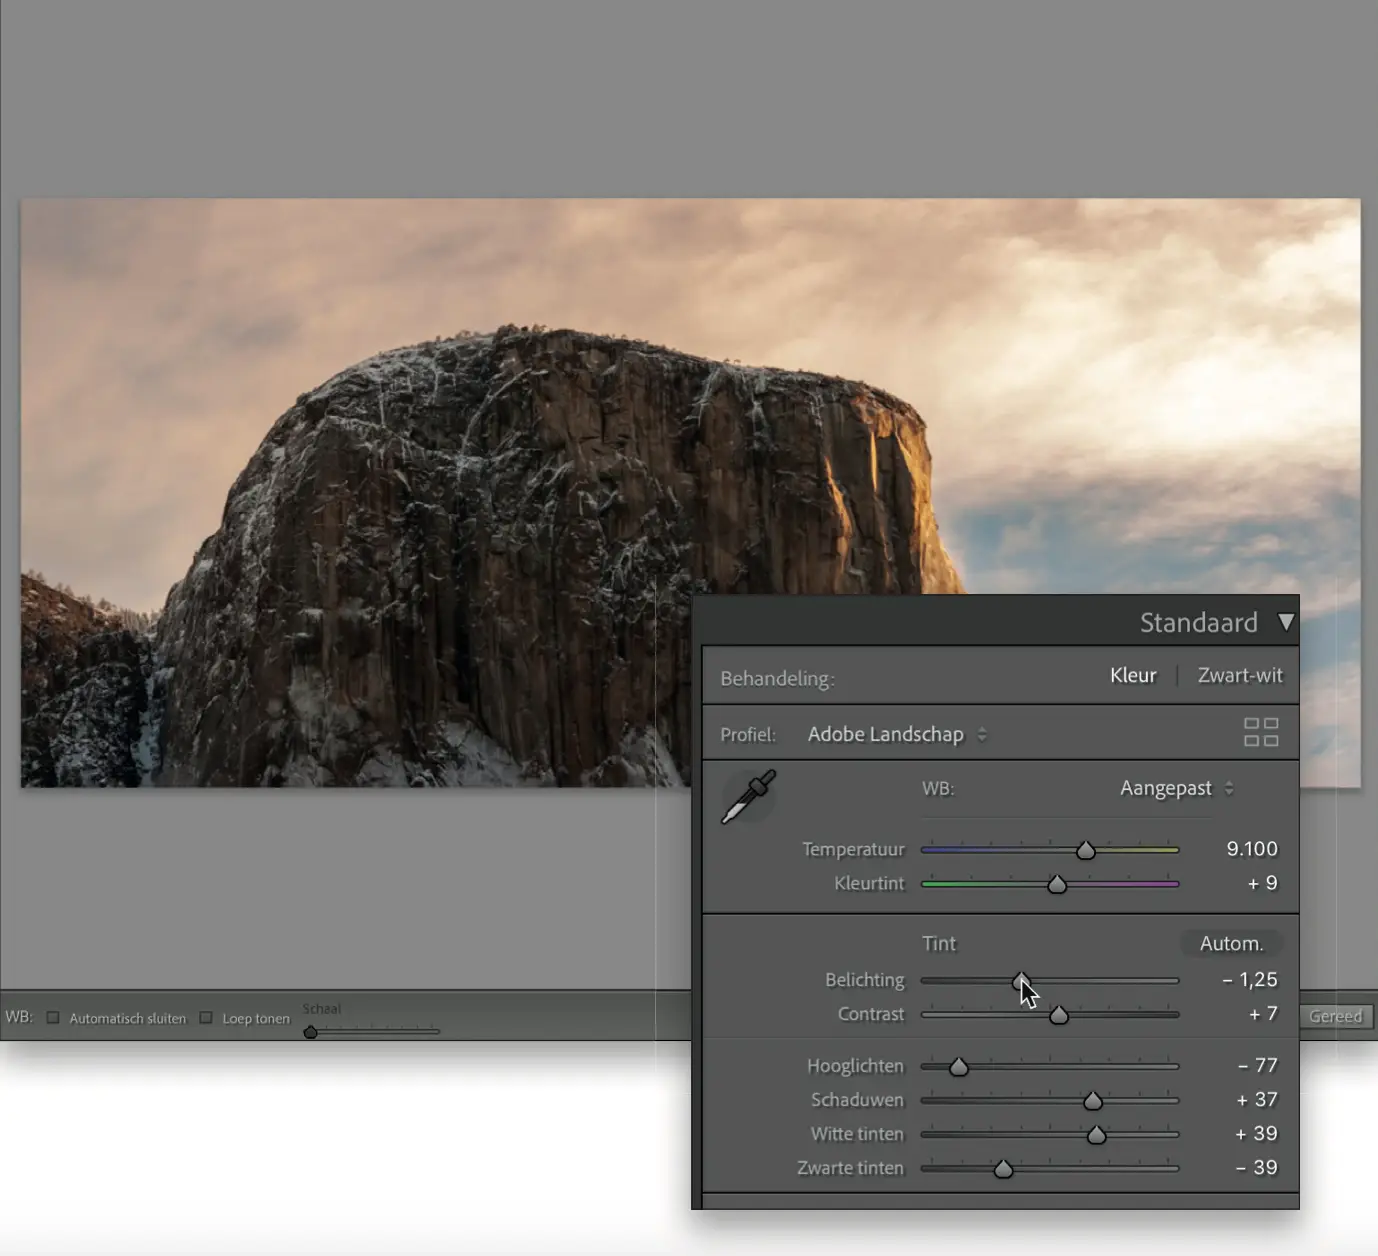
Now it goes (point 3) to adjust the overall exposure of the photo. After an automatic correction when composing the panorama, the white and black points are manually adjusted in Lightroom's 'Light' panel. The values are adjusted to +39 for white and -39 for black, but these values may vary from photo to photo.
Next is the overall exposure of the photo evaluated. To make the sky look better, the exposure slider is moved to the left to -1.25, which makes the photo slightly darker. Although the changes are subtle, they improve the overall look of the photo.
Step 9
Due to backlight on the mountain, the shadow areas are adjusted (point 4). To emphasize details in the sky, the Highlights are reduced to -100. Then the shadows are increased to +88 for a better view of the mountain. Brightening the shadows can make the image a bit dull, so to compensate for this, the contrast has been increased to +18.
Step 10
The right side of the mountain is too dark. It's time to paint with light (point 5). Instead of using the Adjustment Brush, the Graduated filter is used to lighten that part of the mountain. The Graduated filter increases the exposure by approximately 0.75 stops, starting from the sun in the upper right corner and dragging diagonally across the mountain.
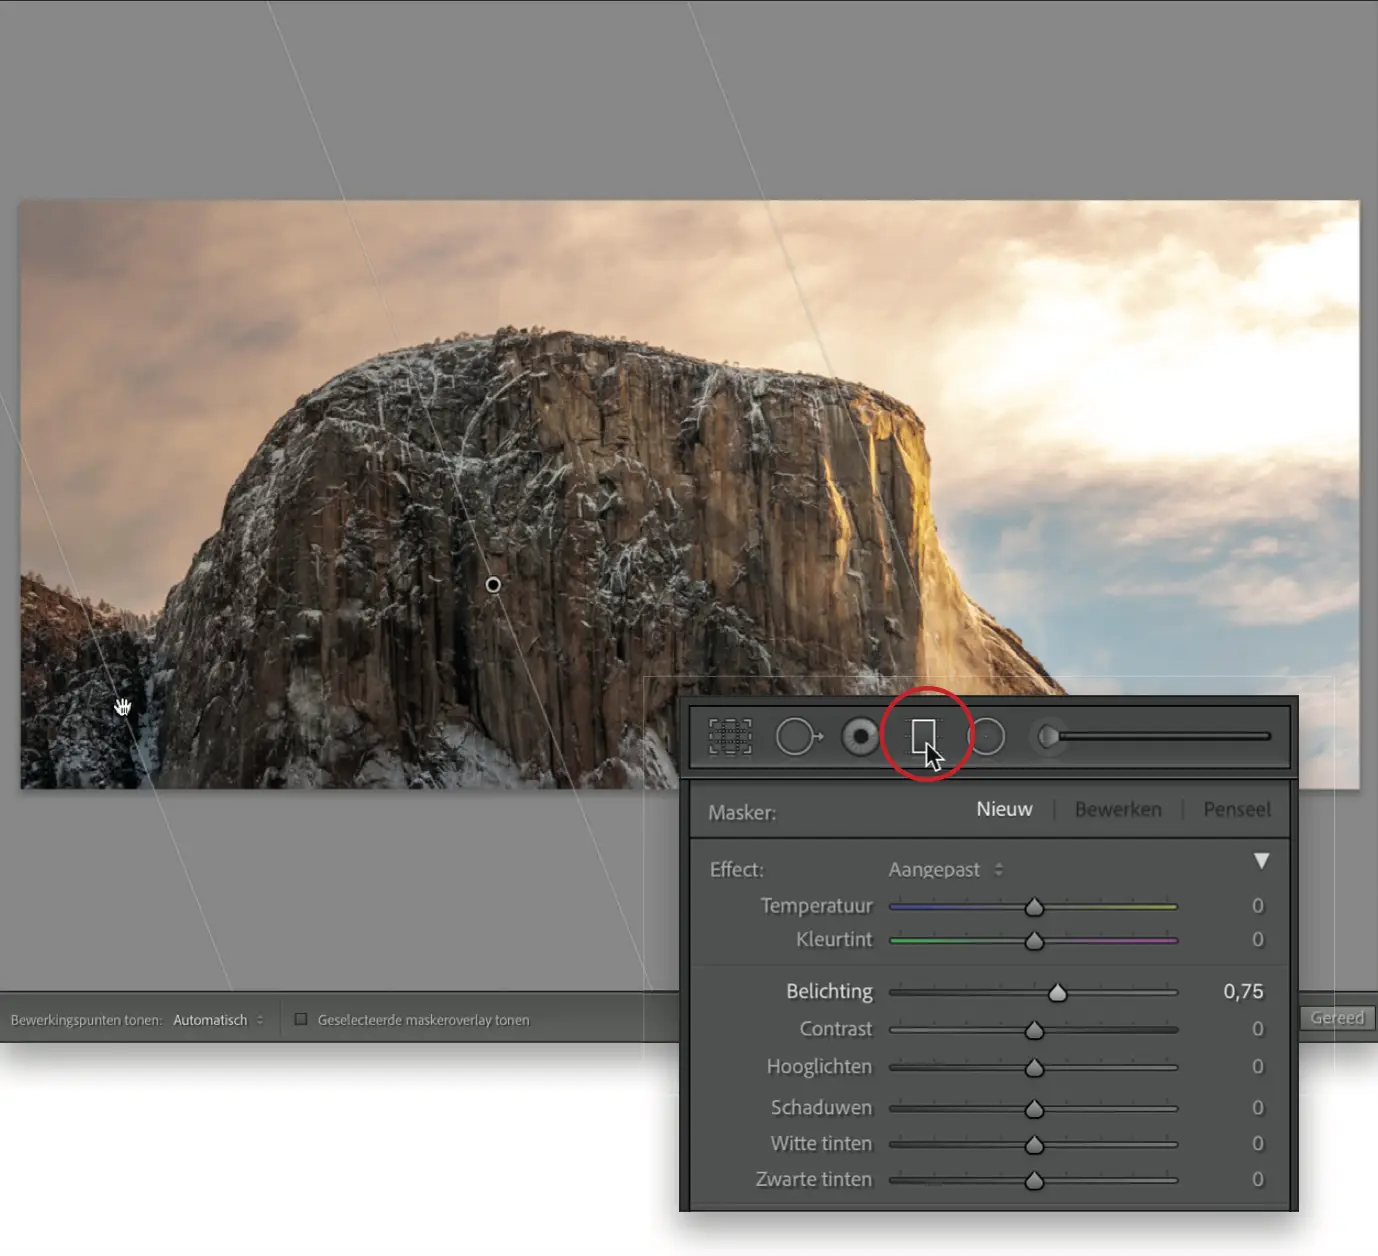
Although this lightens the entire image, the next step will limit this adjustment to just the mountain, to leave the sky unchanged.
Step 11
Now the effect needs to be removed from the sky and other unwanted areas using the Range Mask function. Adjusting the slider below this function will mask out areas of highlights so that only the mountain is affected by the previously applied gradient. Using the Luminance option in the Range Mask menu and dragging the Range Bar slider to the left excludes areas with highlights, such as the sky.
Step 12
How far do you have to drag? Maybe you could benefit from a preview of the mask that Lightroom creates behind the scenes; This allows you to see what is affected. Simply hold down the Option (PC: Alt) key as you drag to bring the mask into view. The black parts of the photo are left alone; the white parts are the shadow areas that are still changing.
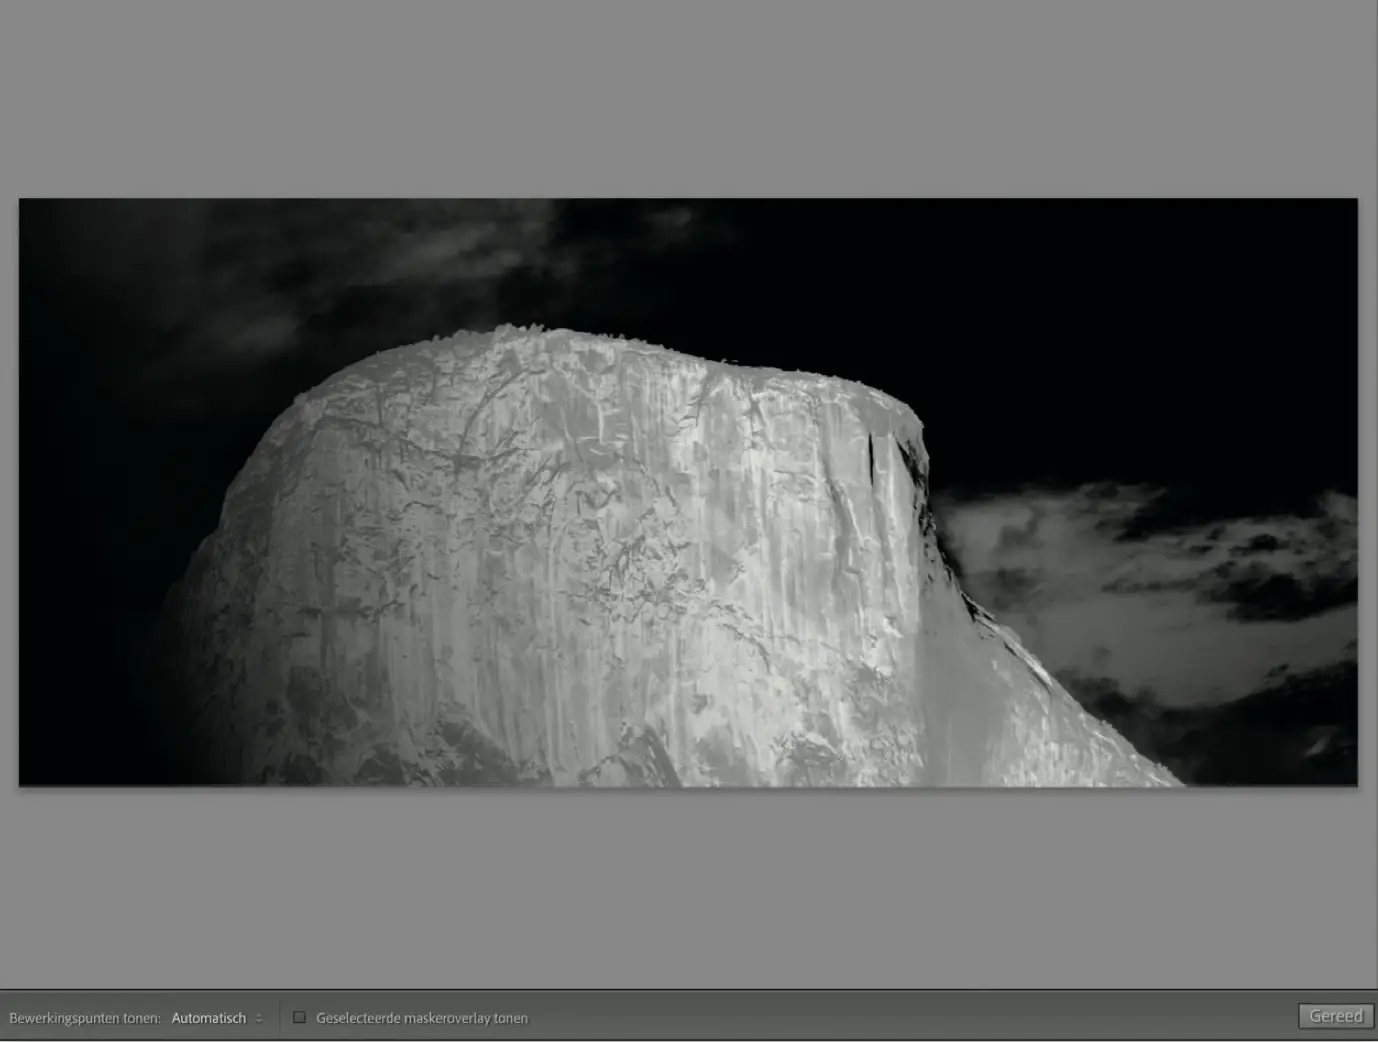
In this case, the right slider was dragged to the left until the sky became almost black, because then you can be sure that any adjustments you make with the regular sliders of the Graduated filter will only affect the parts you see here in white (the mountain) and not the black areas (the sky).
- Tip: There is also another Range Mask option called Color, where you select the area not by brightness, but by a color by clicking with an eyedropper on the color of a part you want to keep.
Step 13
After applying a gradient and using the Range Mask, only the mountain is affectable by the sliders, allowing adjustments to be made specifically for the mountain without affecting the rest of the photo. Adjustments include lightening the mountain with the Exposure slider, optionally lightening the Shadows, increasing the Contrast, and darkening the Blacks for more contrast.
Highlights and Whites are also increased. For more detail, the Texture and Brightness values are increased. Finally, clicking the 'Done' button in Lightroom Classic completes the editing.
Step 14
This photo has no visible lens problems, so point 6 of the system is skipped and the finishing goes straight to (point 7). The edges are darkened a bit and then the whole thing needs to be sharpened.
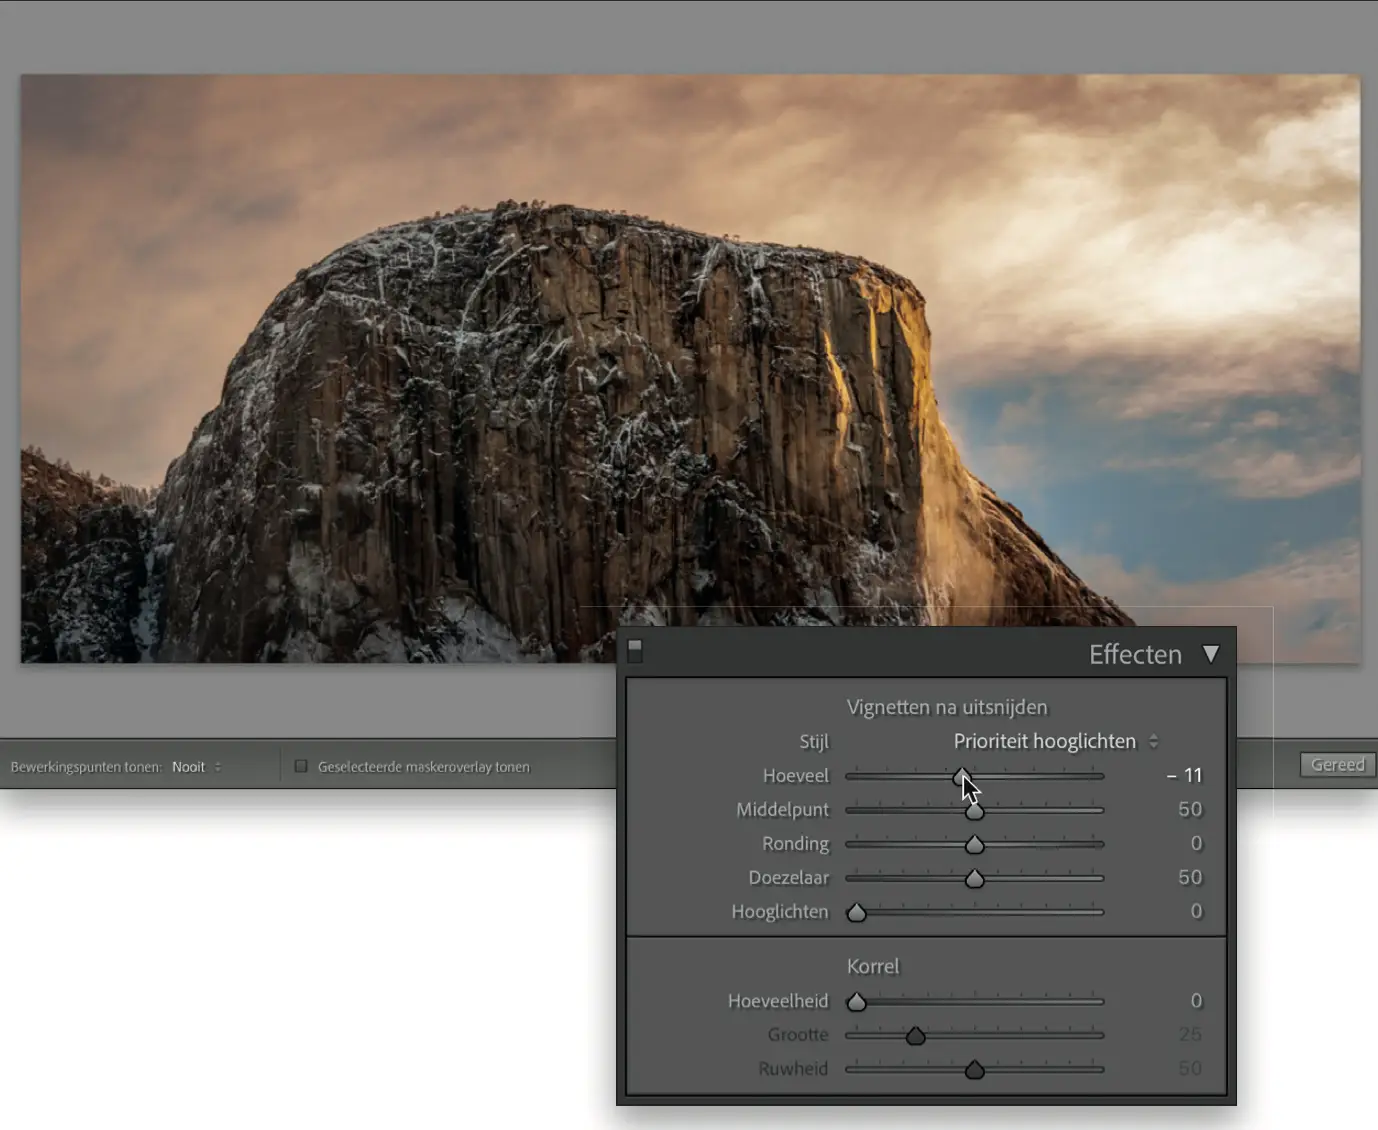
Go to the Effects panel and under Post-Crop Vignettes, drag the Amount slider (the Vignette slider in Lightroom in the cloud) to the left to –11 (the magic number that darkens the outer edges of the photo a bit, without making it look like you added a vignette).
The effect is quite subtle, but you will see what a nice finishing touch this is if you turn the visibility of this operation off and on again a few times.
Step 15
To complete the panorama, the photo is sharpened: the Details panel opens and the sharpening slider (Amount/Sharpen) is set to 80. Because of the many details in it landscapes and other similar subjects, a high degree of sharpening is often appropriate.
With panoramic photos you can also increase the radius of the sharpening, in this example it has been set to 1.2. The amount of Details remains at 25 by default. It is recommended to check the sharpening at 100% magnification, but this is not necessary for smaller print sizes.
Step 16
If you still want to give the photo a cooler tone, return to the Standard panel (the Color panel in Lightroom in the cloud) and choose the preset from the WB (white balance) drop-down list As a recording to return the photo to the white balance setting that was set on the camera.
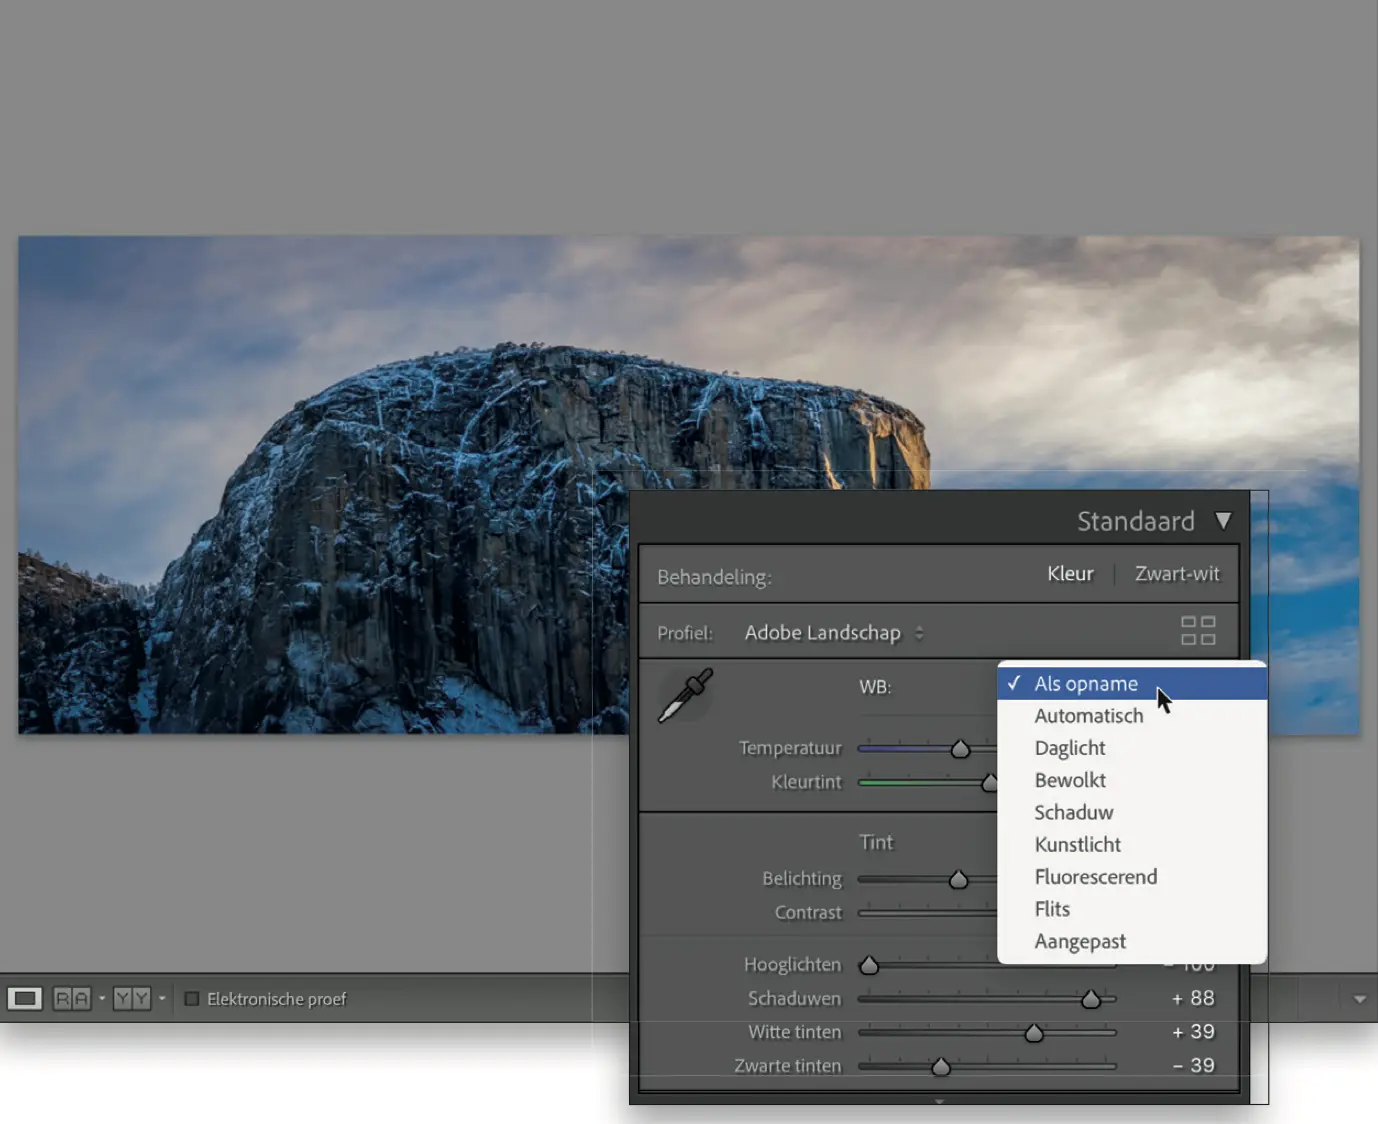
If you don't like the result, use the keyboard shortcut Command-Z (PC: Ctrl-Z) to undo the white balance change.
Step 17
The Cloudy white balance setting isn't nearly as blue, offering some magenta in the sky on the left. This gives a more colorful appearance.
Step 18
Here you see the photo with the white balance Shadow (which you could also have already set on the camera....). Here too you see less blue and you probably get a fairly accurate representation of what the color should have been, although this remains a creative decision that you as a photographer have to make yourself; so you decide what the correct white balance is.
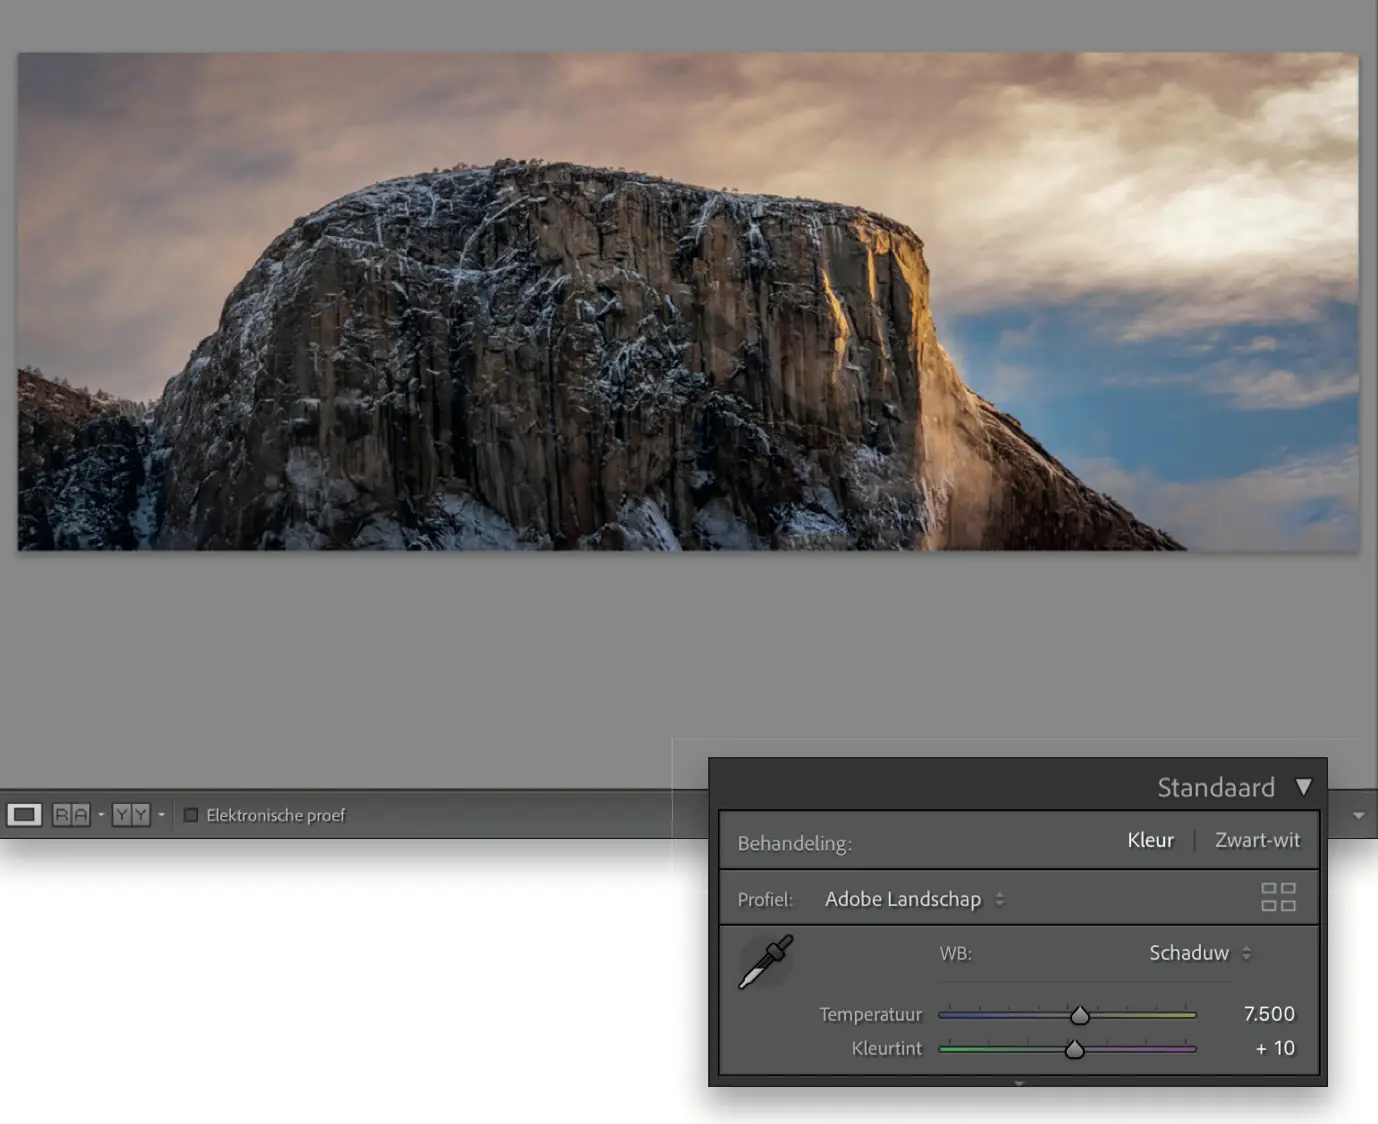
This is Kelby's favorite white balance settings: a hint of blue on the mountain and not too hot or too cold...
Text: © Scott Kelby's seven-point system for Lightroom
Scott Kelby's seven-point system for Lightroom -Scott Kelby
Pages: 272
Price: €39.99
Publisher: VanDuuren Media



